This tutorial will illustrate how to restore a backup of your account. It will assume that you followed the instructions on backing up your account from this tutorial. If you did not follow these instructions, but instead created a backup using another method and are having trouble restoring the backup, please upload the backup file to your account and contact our Technical Support department.
PLEASE NOTE: this tutorial is designed to restore the contents of your public_html folder. This folder contains all information that is accessible via the web on your account. If you are needing your entire account restored or just need one or two files restored, it would probably be best if you contacted our technical support department and have this done for you. Because this tutorial is designed to restore the entire contents of the public_html directory, any file or files that you want to keep should be downloaded locally to your computer and reuploaded after the restore is complete. This is to insure that those files stay up to date. It is imperative that if you have any questions concerning the restore procedures that you contact our technical support staff before a restore is attempted. This is because any changes made after the restore are unlikely to be reversed.
For this tutorial you will need shell access to your account. The shell access that we provide is SSH or Secure SHell. You will need an SSH client in order to access your shell. Two popular SSH clients for Windows are SecureCRT and Putty. If you have not already, you will need to download and install one of these clients. If you are using a different operating system, you will need to find an SSH client for your OS.
To begin, you will need to locate the backup file on your local computer and upload it to your account. The most common method for doing this would be to connect to your account via FTP and upload the backup archive file. Once the file is uploaded, you will need to connect to your account's shell via the SSH client you have installed.
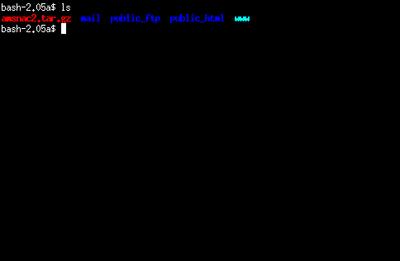
Once you log into your account, you should see a prompt similiar to the one in the below screenshot:
 If you type the command ls at the prompt, you will see a list of files and directories included in your home directory. The files should include the backup file that you uploaded.
 To restore the backup, you will need to issue the following command:
tar -zxvf filename.tar.gz public_html
NOTE: Issuing the above command will overwrite any files that are in your public_html directory. This tutorial is intended for a complete site restore. If you are only needing one or two files restored from your backup, please contact technical support.
To fully understand the above line, I will explain each piece.
First, the filename.tar.gz refers to the backup filename. If you followed the suggestions in the backup tutorial, then this would refer to the username of the account. For example, if your username was amsnac2, the name of the backup file would be amsnac2.tar.gz. You do not have to follow this naming method, but it is a very common method, and whatever method you choose, you should remain consistent with it. At any rate, the name of the backup file should be the same as what you uploaded via FTP.
Second, the parameter list -zxvf tells the tar program what you want to do with the archive. Below is an explanation for each parameter:
- z -- Tells tar that it is dealing with a compressed file.
- x -- Tells tar that the file is going to be decompressed or eXtracted
- v -- Tells tar to be verbose, that is show what it is doing
- f -- Tells tar that the name of the archive file will follow
Lastly the public_html portion tells tar to only extract files from the public_html portion of the archive. This is probably all that you will want to restore.
NOTE: if you leave off the public_html part of the command line, tar will decompress the entire backup file. This will overwrite any other files you may have. This may include e-mail accounts that were set up and any e-mail that was stored in your boxes. Since you probably do not want to overwrite these settings, be sure to include the public_html part at the end of the command.
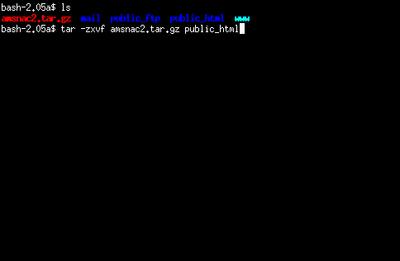
For example if my username were amsnac2 and my backup file was called amsnac2.tar.gz, I would issue the following command:
tar -zxvf amsnac2.tar.gz public_html
This is illustrated again in the screenshot:
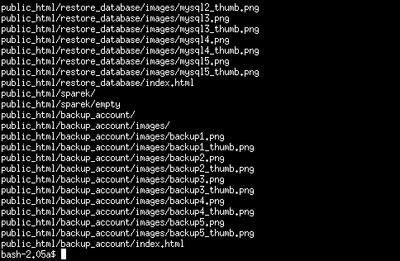
 After you hit enter to issue this command, you should see a list of files that tar is restoring. Notice that all of the files will be in your public_html directory.
 Your backup has now been restored. Your site should appear as it did at the time the backup was created.
If you have any questions or encounter any problems, feel free to contact our technical support department.


